Gutter corners handle a large amount of water during rain. When the joint at the corner starts leaking, water drips along the fascia, siding, or near the foundation. This can lead to wood damage, mold, and soil erosion around the house.
Most corner leaks happen where two gutter sections meet at a miter joint. These joints rely on sealant to stay watertight. After years of rain, heat, and debris buildup, the seal can break. Once that happens, water finds a small gap and begins leaking through the corner.
The good news is that many corner leaks can be repaired without replacing the entire gutter system. The key is identifying the exact cause of the leak and sealing the joint properly.
Table of Contents
Why Gutter Corners Start Leaking
Corner gutter leaks usually develop slowly. A small gap forms in the seam, and water pressure during rain pushes moisture through the joint.
Common causes include:
Old or cracked sealant
Most gutter corners are sealed during gutter installation with gutter sealant. This material dries out and cracks. Once the seal breaks, water can pass through the seam.
Separated miter joints
Heavy rain, debris weight, or shifting brackets can pull the corner pieces apart slightly. Even a small gap can allow water to escape.
Rust or corrosion
Steel gutters often develop rust around seams. When rust spreads, it creates tiny holes that allow water to leak through the corner.
Standing water inside the gutter
If a gutter does not slope properly toward the downspout, water can collect near the corner. The constant pressure weakens the sealant and increases the chance of leaks.
Leaves and dirt trap moisture around seams. Over time this breaks down the sealant and causes small cracks.
These issues explain why corner leaks often appear after several seasons of heavy rain.
How to Identify the Exact Source of a Corner Leak
Before repairing the gutter, it is important to confirm where the leak is coming from. Water often travels along the seam, so the visible drip may not be the actual opening.
Start with a simple inspection.
Look inside the gutter
Remove debris around the corner joint. Leaves and dirt can hide cracks or small holes.
Check the seam closely
Look for gaps where two gutter sections meet. Old sealant may appear brittle or separated from the metal.
Run a hose test
Pour water into the gutter using a garden hose. Watch the corner from the outside. This helps reveal the exact location where water escapes.
Look for rust spots
Small rust holes near the seam often cause slow leaks that worsen during heavy rain.
Inspect the end cap
Sometimes the leak is not in the corner seam but in the end cap seal nearby.
Once the exact source is clear, the repair becomes much easier and more reliable.
Tools and Materials Needed for Gutter Corner Repair
Most gutter repairs require basic tools and a waterproof sealant designed for outdoor use.
Common tools include:
- ladder
- work gloves
- putty knife or scraper
- wire brush
- clean cloth or rag
- garden hose
Materials used for sealing the joint include:
Gutter sealant
This is the most common solution for seam leaks. A thick waterproof sealant fills small gaps and prevents water from escaping.
Waterproof patch products
Products such as Gorilla Waterproof Patch & Seal are often used when the seam has a larger opening or a small hole.
Liquid rubber coatings
Some homeowners use products like Flex Seal Liquid Rubber to create an extra waterproof layer over the repaired seam.
The right material depends on the size of the leak. Small seam gaps only need sealant, while rust holes may require a patch.
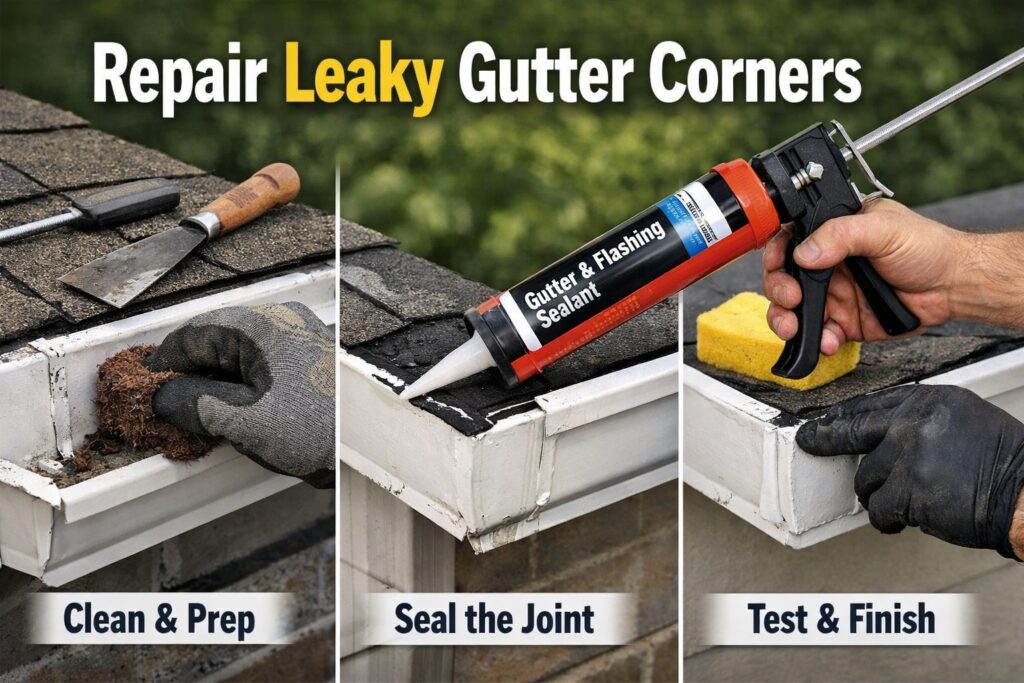
Step-by-Step: How to Repair a Leaky Gutter Corner

Repairing a gutter corner is straightforward if you follow each step carefully. Safety is important—always use a stable ladder and gloves.
1. Clean the gutter seam
Remove leaves, dirt, and old debris from the corner. Use a wire brush for stubborn residue. Cleaning ensures the sealant adheres properly.
2. Remove old sealant
Scrape away any cracked or hardened sealant with a putty knife. Old sealant can prevent the new layer from bonding and lead to another leak.
3. Dry the joint
Before applying any sealant, make sure the seam is dry. Moisture reduces adhesion and shortens the life of the repair.
4. Apply gutter sealant
Use a waterproof sealant suitable for gutters. Apply a thick bead along the entire seam and press it into any cracks or gaps. Smooth it with a putty knife for an even finish.
5. Reinforce with a patch if needed
If the corner has a rust hole or a wider gap, apply a patch over the seam before sealing. Ensure the patch covers the entire damaged area and is pressed firmly into place.
6. Test with water
Once the sealant has cured according to the manufacturer’s instructions, run water through the gutter. Check for leaks and add extra sealant if necessary.
When a Gutter Corner Should Be Replaced Instead of Repaired
Not all leaks can be fixed with sealant. Replacement is necessary if:
- Large rust holes have weakened the corner.
- Aluminum is warped or cracked, preventing a tight fit.
- Repeated leaks occur despite several repairs.
- Seams have completely separated, and sealant cannot bridge the gap.
Replacing the corner joint restores the structural integrity of the gutter and reduces future maintenance. Many gutter systems use pre-formed corner pieces that slide or snap into place. Proper alignment and resealing are essential after replacement.
How to Prevent Gutter Corner Leaks in the Future
Repairing a gutter corner requires careful preparation and proper application of sealant or patch. Follow these steps:
1. Clean the gutter corner
Remove leaves, dirt, and debris from the corner and nearby sections. Use a wire brush or putty knife to scrape away old sealant or corrosion. A clean surface ensures that new sealant adheres properly.
2. Dry the joint
Water prevents sealant from bonding. Wipe the area completely dry with a cloth. If needed, let the gutter dry in sunlight or use a hair dryer for stubborn moisture.
3. Apply gutter sealant
Use a caulking gun to apply a continuous bead of gutter sealant along the seam. Press the sealant firmly into any gaps or cracks. Smooth it with a putty knife for even coverage.
4. Reinforce with a patch if needed
For larger holes or rust spots, cut a patch to fit over the problem area. Apply sealant under the patch and press it in place. Cover the edges with an additional layer of sealant.
5. Test the repair
After the sealant has cured according to the manufacturer’s instructions, run water through the gutter with a hose. Check for leaks at the corner. Reapply sealant if any drips are observed.
6. Inspect surrounding gutters
Check nearby corners and seams. Small cracks may appear elsewhere, and early repair can prevent future leaks.
This method works for aluminum, vinyl, and steel gutters and addresses the majority of corner leak problems.
When a Gutter Corner Should Be Replaced Instead of Repaired
Sometimes repairs are temporary or insufficient. Consider replacing the gutter if:
- The metal is badly rusted or corroded.
- Aluminum or vinyl is warped or bent.
- The corner has repeated leaks despite sealant repairs.
- The miter joint is completely separated and cannot be realigned.
Replacement ensures a long-lasting solution and prevents frequent reapplication of sealant. It may require removing brackets, loosening adjacent gutter sections, and installing a new corner piece.
How to Prevent Gutter Corner Leaks in the Future
Prevention reduces maintenance and extends gutter life. Homeowners should:
- Clean gutters regularly, at least twice a year, to remove leaves and debris.
- Maintain proper slope toward downspouts to avoid standing water.
- Inspect and reseal gutter corners every few years using quality sealant.
- Check for rust spots or small cracks and address them before they grow.
- Ensure brackets and fasteners hold gutters securely to prevent seam separation.
Routine maintenance reduces the risk of leaks and avoids costly repairs to siding, fascia, or the foundation.
FAQ Section
Q1: Why do gutter corners leak?
A1: Gutter corners leak due to cracked sealant, separated miter joints, rust, or standing water caused by improper slope. Debris buildup can also weaken seals over time.
Q2: What is the best sealant for gutter corners?
A2: High-quality waterproof gutter sealant works best. Products like Flex Seal Liquid Rubber or Gorilla Waterproof Patch & Seal provide durable protection for aluminum, vinyl, or steel gutters.
Q3: Can you reseal a gutter joint?
A3: Yes. Remove old sealant, clean and dry the seam, then apply a new bead of gutter sealant. Reinforce with a patch if the joint has rust holes or larger gaps.
Q4: Can silicone seal gutter leaks?
A4: Silicone sealant can be effective on small gaps and cracks, but may not adhere well to rusty metal or wide separations. Use a dedicated gutter sealant for best results.
Q5: Should I replace a leaking gutter corner?
A5: Replace the corner if it has large rust holes, warped metal, repeated leaks, or completely separated seams. Replacement ensures a long-term solution.
Summary
How to repair leaky gutter corners? Leaky gutter corners are usually caused by cracked sealant, separated miter joints, rust, or standing water near the corner. To repair them, first clean and dry the corner, remove old sealant, then apply a high-quality gutter sealant or waterproof patch. Reinforce with a patch if the gap or rust hole is large. After the sealant cures, test with water to ensure the leak is fixed. Replace the corner if the metal is warped, rusted through, or leaks persist despite repairs. Regular cleaning, proper slope, and occasional resealing can prevent future leaks.
Contact Gflow Kennesaw for all types of gutter services, or call us for free quotes